Broccoli, Pea, and Cilantro Soup – The Easiest Soup You’ll Ever Make

DSC_0805

Hello All,

I currently write this post not from the comfort of my apartment in San Francisco, but rather from the stark and impersonal confines of a hotel room in Los Angeles. Having recently been transferred to a project that requires that I travel to Los Angeles for 3 weeks of each month has been somewhat of a disruption to my normal routines and daily life (to put it mildly). Please, don’t misunderstand me, for I am very grateful for the opportunities to spend time back in Southern California where there is a never-ending supply of sunshine, blue skies, and friends. However, cooking regularly is rather difficult when you see your kitchen for perhaps a weekend at a time. Those of you who know me well know that I am particularly fond of cooking (again, putting it mildly) and often find myself wishing that I could just cook and bake all day long. Now, that is a mere pipe dream as I face the reality that is a full-travel project.

Perhaps harder yet than cooking regularly is eating wholesome, healthy food regularly. Being in LA for part of the week means that my team and I end up eating out for every meal. Literally. Yet, that doesn’t mean I have to eat poorly (and subsequently suffer the consequences of such impulsive decisions). Sometimes, something as simple as preparing your delicious soup, with only delicious, healthy ingredients, is what you need to maintain your gastrointestinal sanity and recover from those crazy weeks of binge eating.

And best of all, it takes almost no effort to make.

Ingredients

  • 1 onion, diced
  • 4 cloves garlic, diced
  • 2 tbspns coconut oil
  • 4 cups water
  • 1 cube chicken (or vegetable) bullion
  • 3 cups broccoli
  • 2 cups peas
  • 1/4 cup cilantro
  • salt and pepper

DSC_0774Start by chopping your onions and dicing your garlic. As many of you know, onions and garlic are my two favorite ingredients for any savory dish. Perhaps this is a remnant of my childhood days watching my grandmothers each cook with copious amounts of both ingredients, or perhaps it’s just my subconscious recognizing the undeniable truth that is the delicious, fragrant wonder of garlic and onions. Either way, I know that they are always the first ingredients I reach for.

DSC_0775
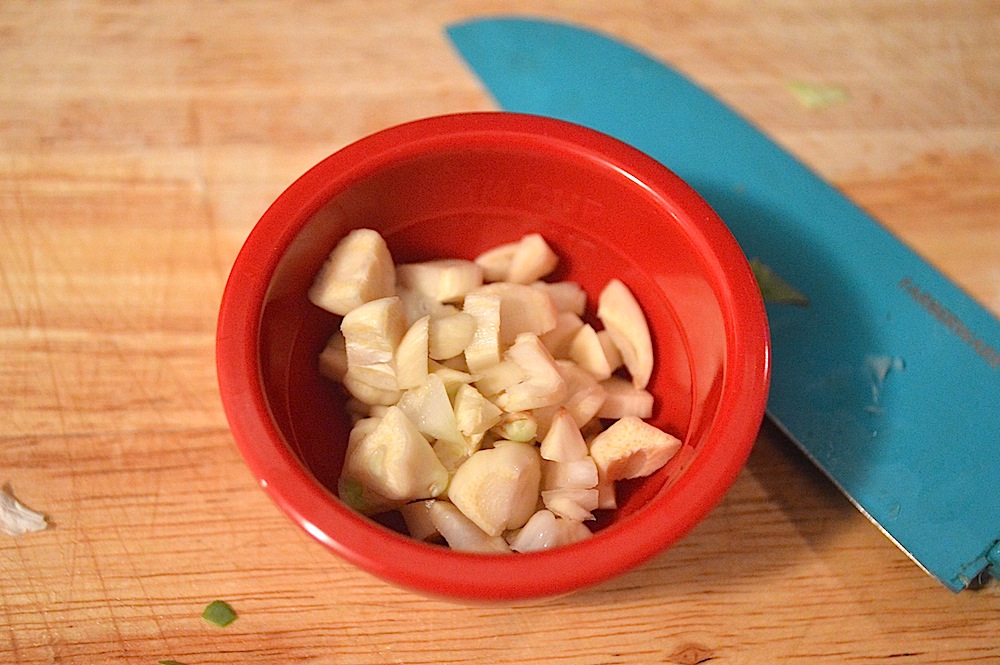
My advice to you is not to fret about the size or uniformity of your chops when it comes to garlic and onions for this soup. Since it will all be blended together later into delicious liquid form, you really should only focus on making these first few steps as easy as possible for yourself. Chop them coarsely and set aside.

DSC_0782Once your onions and garlic are prepared, heat your coconut oil in a soup pot on medium-high heat. Add in the garlic and onions, stirring frequently to let them saute and gain a beautiful pearly translucence. Before they are completely sauteed to mushy nothingness, add in your 4 cups of water and the chicken bullion cube.

DSC_0785Bring the soup base back to a boil. As soon as the pot is simmering, let it gently boil for an additional 2-3 minutes.

DSC_0793

After letting the onions, garlic, and soup boil, it’s time to add the main attraction of the soup – the peas and broccoli. Out of necessity (and convenience), I used frozen broccoli and peas. I have nothing against it, and encourage it if you do not have fresh ingredients on hand. Once added, go ahead and bring the soup back to a gentle boil, leaving it to simmer for an additional 15 minutes.

DSC_0796

After the vegetables have thoroughly cooked and warmed, soaking in the flavors of onion and garlic, transfer all of the ingredients in the soup pot to your trusty blender. If it doesn’t all fit in one turn, blend half the ingredients at first, and then repeat with the second half of the ingredients.

DSC_0798Add in your cilantro to the ingredients in the blender.  Cilantro, which is a hit or miss ingredient for many people, I find adds a lot of character to a soup like this one. It’s got a somewhat strong flavor, and is very earthy and herbed. Yet, when added in as a flavor note in a soup like this, it really only helps to blend all of the ingredients together (see what I did there?).

DSC_0800

Give the blender a few pulses to make it all blend evenly, and you’re done! It’s really and truly that simple to create a delicious dish that is both hearty, tasty, and healthy.

I’ve known many people who, in the face of the adversity of maintaining a healthy lifestyle while traveling every week and eating out constantly, feel overwhelmed and simply give up on being healthy. Frankly, it’s far easier to just say “Forget it, I’m going to do what I want”. Been there, done that.

Yet, for whatever reason, I’ve recently come to the realization that your health is not something you can bargain with. You can put off mowing the lawn or doing laundry, but you can’t put off taking care of your body. You can’t do irreparable damage to it now, and then hope that some day down the road, you’ll be fine. Yes, I still enjoy eating burgers with my friends, going to Bi-Rite in the Mission for ice cream, and drinking wine while reading my book in my apartment. I don’t think anyone should just give up foods they love. But I DO believe in eating them in moderation, and doing your absolute best to eat healthy the majority of the time.

May this soup find you healthy, happy, and wholesome.

Bom Apetite!

Potluck Problems Pacified – Caramelized Green Onion Sweet Potatoes or Chicken Curry Salad

intro.jpg


Many apologies for the long lapse since my last post! As life is wont to do, it got busy. Part of my business comes from becoming more involved at work, and spending more time with my coworkers, whom I’m growing more and more fond of! The best part of a big team is team bonding activities like…potlucks!!!

Recently, I made two separate dishes that are great for potlucks. And each with less than 5 ingredients, they are incredibly easy to make!


Chicken Curry Salad 

  • 2 chicken breasts, cooked and cooled
  • 1/2 cup nonfat plain greek yogurt
  • 2 tsp curry powder
  • 1/4 cup raisins
  • 1/4 cup sliced almonds
  • salt and pepper


DSC_0694

I have to admit, making this Chicken Curry Salad may have been one of the easier recipes I’ve undertaken. Aside from cooking the chicken, it’s literally all about mixing. Unless you have rather spastic muscles, which in turn prevents you from holding a spoon long enough to stir these few ingredients together, you will definitely be able to master this recipe.

DSC_0689

Start with your chicken. Cutting the chicken into bite sized pieces, place them in a separate bowl. I used thigh meat, as it’s my favorite, but breast works equally well (if not better) for a salad.

DSC_0691

Next, add in your greek yogurt. I absolutely love the tartness that the greek yogurt added to my salad. It wasn’t overpowering, but made it all feel light and healthy instead of bogged down by sugar or other flavors. I apologize in advance, my pictures indicates that there is a high ratio of yogurt to chicken. I over-calculated when I first added the yogurt, and ended up adding more chicken after the fact.

DSC_0692

Add to your chicken and yogurt the 2 teaspoons of curry powder. A common misconception regarding curry powder is that it makes your food spicy. In reality, it is simply a flavoring spice, and adds very little kick (albeit some). I have only recently realized just how zesty curry really is, appreciating the warm, spiced, earthy taste it adds to my chicken, soup, and rice.

DSC_0698

After the curry powder, simply add all the fun stuff! Raisins and almonds give such a tender sweetness to the dish. I always find myself overdoing it (the more raisins, the better, usually). However, for the purposes of keeping this mildly healthy, I restrained myself. Gently mix all of this together, add salt and pepper to taste, and voila! Chicken Curry Salad!

Many variations I’ve seen include golden raisins instead, adding grapes, adding green onions, adding shredded carrots, and whatever other spices your heart desires. I simply chose the simplest version, and want you to add your own creative twist!

Caramelized Green Onion Sweet Potatoes

  • 4-5 large sweet potatoes, peeled
  • 3-4 stalks green onions, diced
  • 3-4 cloves garlic, diced
  • 2 tblspns brown sugar
  • 3-4 tbslpns coconut oil
  • salt and pepper


DSC_0702

DSC_0703

 Sweet Potatoes are one of my favorite vegetables/starches. Slightly sweeter than the regular potato, they are very flavorful and have a great texture when mashed. And although it’s not considerably more than the regular old boring potato, they have more nutrients!

To prepare your sweet potatoes, first peel them and wash them. Sadly, we must discard the nutrient rich skins for this recipe. Then, cut them up into smaller chunks and place in a pot of water to boil. Boil all of your sweet potatoes for 10-15 minutes, or until they are easy to pierce with a fork. Remember, you want them to be a consistency that is easy to mash up.

DSC_0707DSC_0710

While the potatoes are boiling, let’s caramelize our green onions! Chop your onions  into small diced bits, and put aside.

DSC_0713

Melt your coconut oil in a skillet on medium heat. Once the oil is properly heated, add in your green onions! Let them crisp and cook in the oil for about 2-3 minutes, then add your garlic. Let that cook an additional 2 minutes. Be sure to stir often enough to keep anything from sticking or burning. If the garlic seems like it’s burning, go ahead and lower the heat. You want the sweetness of the garlic to come out, and certainly don’t want any charred crispy black bits in your mashed sweet potatoes.

DSC_0716

Once the onions and garlic are cooked to softness, turn down the heat to low and add your brown sugar. Once you add the brown sugar, you’re going to want to stir this constantly so as to keep anything from clumping or turning into a sticky, chewy mess.

DSC_0719

( you can see how I didn’t turn down the heat enough because the sugar did not mix thoroughly enough with the oil. Whoops!)

As soon as you’ve mixed the brown sugar into the coconut oil-green onion-garlic mixture, turn off the heat and set aside. Then, in a separate bowl, start mashing your sweet potatoes. They should be rather easy to mash if you’ve cooked them long enough. Once they’re mashed, add in your coconut oil mixture, salt, and pepper. Mix more thoroughly, helping the coconut oil to smooth it all into a more velvety consistency. Once you’ve mixed it to the point where you can’t take another second of waiting to eat, go ahead and chow down!

DSC_0731


These potluck inspired dishes couldn’t come at a more significant time for me emotionally. As we all change in our own personalities, views, and personas, we find it harder to reconcile who we are as an individual with who we are as part of a group. I myself have had difficulties “fitting in” my loud, gregarious, awkward personality with some of my quieter, more sensitive coworkers. Additionally, the transition to work life has, as most large life changes can be, been rather hard to undertake as I find myself constantly stressed, tired, or worn out. Spending all day at a computer, working and focusing, does not encourage staying out even later afterwards to partake in extracurricular activity. More than anything, the transition leaves me frequently yearning for the days of college when I was constantly surrounded by friends, constantly busy with things to do, and far less overwhelmed by the responsibilities of adulthood.

These potluck dishes for me were simple and flavorful, as well as fun and personal, allowing me to bridge the gap between who I am individually and who I am in the group setting. They, to me, are a symbol of finally making that transition to a point in my new life here in San Francisco where I am starting to feel truly at home. As we shared our dishes, I enjoyed sharing foods that I find comforting and tasty with those who are part of my team, and also enjoyed trying theirs in turn. I felt included, and inclusive. I felt that I had people I knew on both a professional and personal level, and that I was finally making the connections I have felt void of when I first began my job. As many of my friends and family know, food to me is more than just nourishment, but a symbol of communion and sharing that I think delves deeper into our connection with each other as humans than most other things can. I love potlucks simply for the way that they allow us to share something of ourselves with others, and to receive likewise in turn. I hope that you will find the same joy in making (and sharing) these dishes as I did.


Bom Apetite!


A Special Treat: Super Smash Bros Cake!

cake collage

Every young person dreams of finding a job where she can have fun with her coworkers and really enjoy her time with them, both during and after work. Which is why I consider myself a very, very lucky lady. Tomorrow, after work, my team will be partaking in a self-organized Super Smash Brothers melee (there are nearly 20 of us, so it’s actually feasible) with potlucking and partaking of the wine. I thought it would be fun to surprise my team with a butter vanilla cake decorated like a Mario Mushroom!

The recipe for the cake was converted from a Sable Breton butter cake tart recipe found hereThe recipe itself is incredible easy. I’ll rehash it out here since I had to convert it from metric. 

Ingredients:

  • Cake:
    • 4 egg yolks
    • 2/3 cup butter
    • 1 cup flour
    • 1.5 tsp baking powder
    • 2/3 cup sugar
    • splash of vanilla
  • Frosting
    • 2 cups powdered sugar
    • 1/2 cup butter
    • 2 tspn vanilla

DSC_0240

Start by preheating your oven to 325° F, and buttering a small pan to grease it. The original recipe called for four small round tins, but wanting to make a larger cake, I just placed all of the batter in one dish. I’d like to preface the actual preparation instructions by saying that I had a difficult time following the instructions, so some things were done out of order…

DSC_0241


Cream the butter (without melting) with your beaters or a wooden spoon. Once it is creamy and smooth, add in your sugar and mix thoroughly. I like to use electric mixers because a) it’s easier, b) it’s faster, and c) it ends up much smoother and creamier that way.

DSC_0248


DSC_0252


Add in your yolks to the sugar/butter mixture. Separating yolks from egg whites is not extremely difficult, although it can take a little bit of practice. I ended up saving my discarded egg yolks and making myself breakfast for the next day (no sense in wasting!). Using your mixer, beat it all together thoroughly. This will give it a delicious buttery yellow look. Hopefully, you don’t have any lumps in the mix!

DSC_0249

DSC_0251


Next, add together your baking powder, salt, and flour in a separate bowl. Mix loosely with a fork (helps aerate and mix it thoroughly) to get it to mix together. Although I did not take a picture of it, I ended up getting out my sifter (so much fun!) and sifting it all into the bowl of yolk mixture. However, if you don’t have a sifter, this is the time to make sure it all mixes evenly, and there are no lumps!

DSC_0256

DSC_0261

Once the batter is well mixed and smooth, spread it evenly in the greased pan. Place the pan in the oven and set a timer for 15 minutes. I like to set the timer for less than the recipe says as my oven tends to be overactive and burn my baked goods. I ended up baking for a total of 20 minutes, or until a toothpick came out clean from the center of the pan. Thankfully, while baking it smoothed out and lost those ridges above (probably due to the copious amounts of butter), thus making it easier for future frosting!

Once the cake has baked appropriately, set aside to cool! This will take quite a while, so if on a time budget, consider making the cake ahead of time. You can also try putting the cake in the fridge to help it cool, although I feel like that is not the best solution for a delicious, buttery, warm cake like this. :p

DSC_0264


While the cake bakes (and cools), you can prepare the frosting by melting the butter in a microwave safe bowl, and then combining all of the frosting ingredients with an electric beater on high speed. I ended up setting aside white frosting for the circles and the eyes, and then just coloring the rest with red food dye.

Spread a nice even portion on the top half of the cake, rounding upward in the middle to create the round shape of the mushroom. Do your best, trust me, it doesn’t have to be perfect.

DSC_0266

Then using a black frosting ( I had to cave and buy a tube of black at Target since I didn’t have black colored dye), shade in the outsides to create the slimness of the bottom portion of the mushroom. Mine ended up looking a little like he had some serious side burns, but I still loved it. Additionally, use the black to create the underpart of the eyes by placing two nice little strips side by side with a small dot of the leftover white at the top.

With that, you have a finished, beautiful Super Smash Bro’s themed Mushroom cake! Bom Apetite!